Posts Tagged ‘Windows’
August 12th, 2017
I happen to have OSX as host and Win10 as virtual machine.
I have also mapped a folder so it is reachable from both OSX and Windows.
OSX has Docker installed.
Create the project in Windows/Visual studio 2017
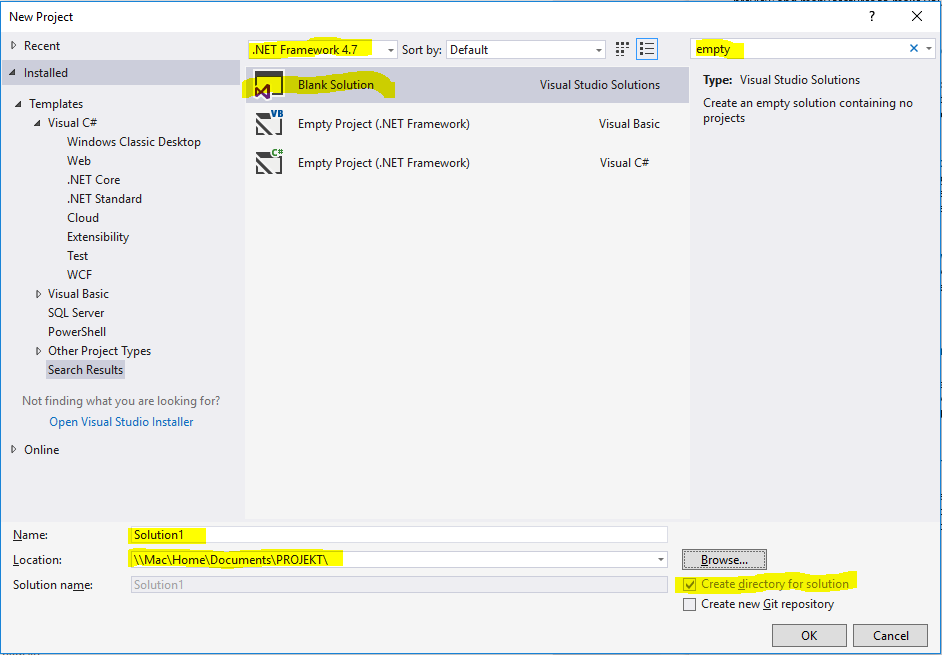
Create a blank solution somewhere both Windows and OSX can reach. In this article I chose
\\mac\home\documents\PROJEKT
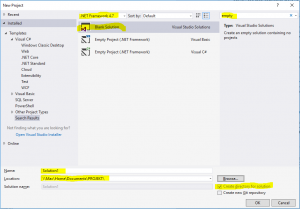
Whatever dotnet version is visible at the top of the dialogue is not of interesting as we are creating a solution file and not much more and then we add Dotnet core specific stuff. You can search for the template through “empty” or “blank”.
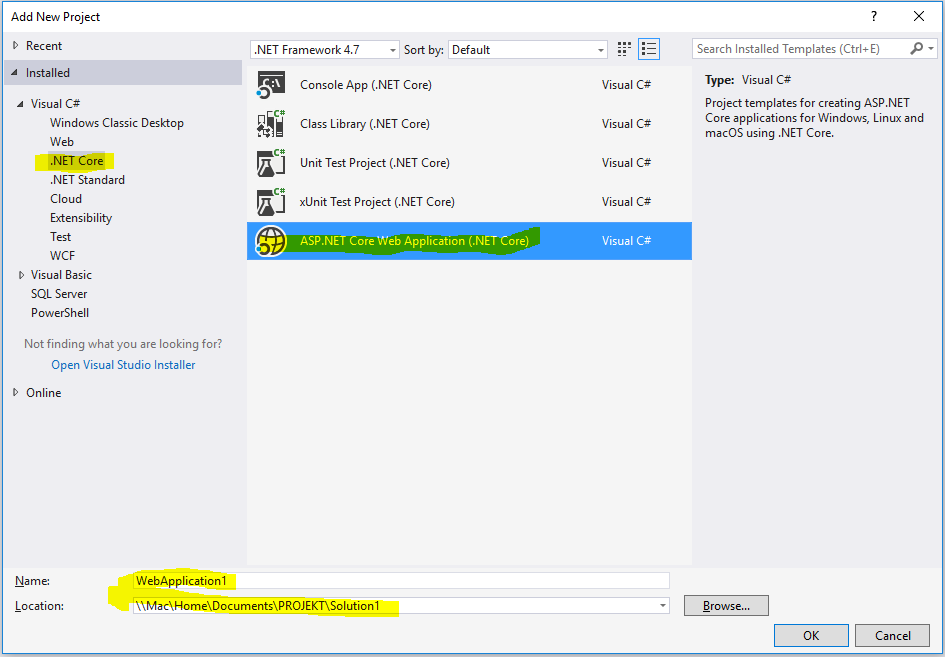
Add an Aspnet core application project. Keep the standard name of simplicity. The path is in the solution \\Mac\Home\Documents\PROJEKT\Solution1
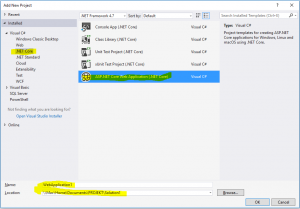
Dotnet version is still not necessary as it refers to Dotnet framework and we are caring about Dotnet core.
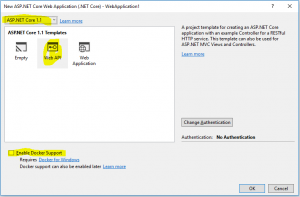
Select Dotnet core 1.1. This text is written in August 2017 and Dotnet core 2 is due November. Select WebApi. Do not add docker support. It would probably not make any change but in this exercise we are targeting running the container in OSX. If you change your mind and do want Docker-for-windows support you can always do that later with the click of a button.
When the project is added compile and run to see that all cog wheels are in place and in working order.
Tip from the trenches: Ctrl-F5 compiles, starts the web server and pop ups a web browser in one click, without having to start the debugger.
Note the URL. It is something like http://localhost:2058/api/values where /api/values is something to briefly remember. See that in the browser window there is the text [“value1″,”value2”]. It is created through the Get method in class Controllers/ValuesController.cs the “normal MVC way”.
Publish in Windows
If you right click the project (=activate the context menu in the solution explorer pane on the WebApplication1 project) there is a choice “Publish…”. AFAIK it is used for Windows or Dotnet framework stuff so leave it be.
Instead we use the CLI for restoring, publishing and activating.
If you open the console in windows you cannot use the UNC path we have put the project in. So instead use pushd like so:
> pushd \\Mac\Home\Documents\PROJEKT\Solution1\WebApplication1
Then restore the files with dotnet restore. Restoring in this case means pulling in all dependencies so we have everything we need.
It will look someting like:
> dotnet restore
Restoring packages for V:\Documents\PROJEKT\Solution1\WebApplication1\WebApplication1.csproj…
Generating MSBuild file V:\Documents\PROJEKT\Solution1\WebApplication1\obj\WebApplication1.csproj.nuget.g.props.
Writing lock file to disk. Path: V:\Documents\PROJEKT\Solution1\WebApplication1\obj\project.assets.json
Restore completed in 1,58 sec for V:\Documents\PROJEKT\Solution1\WebApplication1\WebApplication1.csproj.
Restore completed in 1,81 sec for V:\Documents\PROJEKT\Solution1\WebApplication1\WebApplication1.csproj.
NuGet Config files used:
C:\Users\username\AppData\Roaming\NuGet\NuGet.Config
C:\Program Files (x86)\NuGet\Config\Microsoft.VisualStudio.Offline.config
Feeds used:
https://api.nuget.org/v3/index.json
C:\Program Files (x86)\Microsoft SDKs\NuGetPackages\
Now publish with publish:
> dotnet publish
Microsoft (R) Build Engine version 15.1.1012.6693
Copyright (C) Microsoft Corporation. All rights reserved.
WebApplication1 -> V:\Documents\PROJEKT\Solution1\WebApplication1\bin\Debug\netcoreapp1.1\WebApplication1.dll
As we didn’t specify an output path we get the result in bin\Debug\netcoreapp1.1\.
> dotnet run
Hosting environment: Production
Content root path: V:\Documents\PROJEKT\Solution1\WebApplication1
Now listening on: http://localhost:5000
Application started. Press Ctrl+C to shut down.
Note the back slashes and that I never said to change OS. We have just started the web server in Windows.
Check it by opening a web browser and go to http://localhost:5000/api/values
You should have [“value1″,”value2”] as output. Nothing surprising.
Shut down the application (ctrl-c in the console) and refresh the browser to verify that we really are surfing to our site and not Visual studio and IIS(express).
If you want to go spelunking in the container try opening a terminal directly or connecting one.
OSX
Open an OSX terminal at your web project, where WebApplication1.csproj is. Typically something like
/Users/username/Documents/PROJEKT/Solution1/WebApplication1
If you do a dotnet run now you get an error.
> dotnet run
/usr/local/share/dotnet/sdk/1.0.1/Sdks/Microsoft.NET.Sdk/build/Microsoft.PackageDependencyResolution.targets(154,5): error : Assets file ‘/Users/username/Documents/PROJEKT/Solution1/WebApplication1/V:/Documents/PROJEKT/Solution1/WebApplication1/obj/project.assets.json’ not found. Run a NuGet package restore to generate this file. [/Users/username/Documents/PROJEKT/Solution1/WebApplication1/WebApplication1.csproj]
/var/folders/5l/1bssc0z152s_shv8j8nb9htm0000gn/T/.NETCoreApp,Version=v1.1.AssemblyAttributes.cs(4,20): error CS0400: The type or namespace name ‘System’ could not be found in the global namespace (are you missing an assembly reference?) [/Users/username/Documents/PROJEKT/Solution1/WebApplication1/WebApplication1.csproj]
Alas restore, publish and run.
> dotnet restore
Restoring packages for /Users/username/Documents/PROJEKT/Solution1/WebApplication1/WebApplication1.csproj…
Restore completed in 784.3 ms for /Users/username/Documents/PROJEKT/Solution1/WebApplication1/WebApplication1.csproj.
Generating MSBuild file /Users/username/Documents/PROJEKT/Solution1/WebApplication1/obj/WebApplication1.csproj.nuget.g.props.
Writing lock file to disk. Path: /Users/username/Documents/PROJEKT/Solution1/WebApplication1/obj/project.assets.json
Restore completed in 1.7 sec for /Users/username/Documents/PROJEKT/Solution1/WebApplication1/WebApplication1.csproj.
NuGet Config files used:
/Users/username/.nuget/NuGet/NuGet.Config
Feeds used:
https://api.nuget.org/v3/index.json
Why we need to restore it again is something I haven’t grokked yet. To be honest – if I hadn’t tricked you into, unnecessarily, restoring on the Windows machine first you wouldn’t have noticed.
> dotnet publish
Microsoft (R) Build Engine version 15.1.548.43366
Copyright (C) Microsoft Corporation. All rights reserved.
WebApplication1 -> /Users/username/Documents/PROJEKT/Solution1/WebApplication1/bin/Debug/netcoreapp1.1/WebApplication1.dll
> dotnet run
Hosting environment: Production
Content root path: /Users/username/Documents/PROJEKT/Solution1/WebApplication1
Now listening on: http://localhost:5000
Application started. Press Ctrl+C to shut down.
Open another console and curl:
> curl localhost:5000/api/values
to get the result:
[“value1″,”value2”]
You can of course open a web browser to do the same.
Don’t forget to stop the application if you want to continue as otherwise a file might get locked.
Start container
Install Docker on your mac unless you already have.
You can probably do whatever is described here on your Win10 machine with Docker for windows.
But I happen to have OSX and a virtualised Windows10 through Parallels. It is said to be possible to run Docker for windows in Parallels but then I have to fork out another 50€ (per year?) for the Pro version; and having a virtualised Windows to virtualise yet a machine creates a performance penalty also on the host OS. My machine is running warm and noisy as it is.
Start
> docker run -p80:80 -ti –rm -v /Users/username/Documents/PROJEKT/Solution1/WebApplication1/bin/Debug/netcoreapp1.1:/Web microsoft/aspnetcore /bin/bash -c ‘cd /Web/publish; dotnet WebApplication1.dll’
Hosting environment: Production
Content root path: /Web/publish
Now listening on: http://+:80
Application started. Press Ctrl+C to shut down.
Caveat: For almost a full day I got the error message docker: invalid reference format.
which was somehow related to microsoft/dotnet:1.1.2-runtime
which was wrong because when I rewrote the very same text it suddenly started. My first guess was that there was a hidden character somewhere but I rewinded to an earlier command that had failed and suddenly it worked.
If you care already now about the parameters for docker run they are:
-p80:80
I did not want to make this quick start unnecessary complex by having lots of different ports so everything is running on port 80.
With that said; as Kestrel (the web server we instantiated in Program.cs runs in aspnet it talks on port 80. Then we open a hole in the container from port 80 to port 80. This latter is what -p80:80 means.
-ti
This gives us a terminal, of sorts, and something about how it receives commands.
-rm
This one cleans up after our run so there is no halted container wasting hard drive space when the container stops.
-v /User….:/Web…
This parameter lets the continer use /Web to reach folder /User… where we have put our code.
microsoft/aspnetcore
This is the name of the image we use. An image is to a container what a class is to an object.
In this article we don’t adapt the microsoft/aspnetcore image, created by microsoft especially to run aspnet core solutions, to anything but use it as it is.
As we have not specified a version we get the latest.
Microsoft has many images for different uses.
/bin/bas…tion1.dll’
Execute a command in bash.
The command happens to be “start the web server”.
Call the web server in the container
Then open another terminal and curl:
> curl localhost:80/api/values
[“value1″,”value2”]
Yay! The web server in the container runs your dotnet core web application.
April 6th, 2016
I have the host OSX for administrative tasks
and then one VM per Windows OS.
I would prefer to have one VM per customer but have not come around to it.
Setting up a new VM does not take that much time but installing Visual studio, Sqlserver, Chocolatey and configuring everything does. When Windows updates 7->8->8.1->10 I create new machine and copy stuff I need as I go; instead of updating the VM. This is my way of continuously cleaning my work space.
The only issue I have run into is multi monitor support that sometimes is a bit shaky to set up but it has stabilised every time. (as I write this my second monitor switches to green every time my screen saver has kicked in and I have to replug it)
I run Parallels which is not gratis and not even cheap. To add insult to injury they make sure to not support newer OSX and Windows versions as they come out. This means that the one time price (presently upgrade is 50€) has to be paid several times, like every other year or so.
I have not compared Parallels to their competitors Fusion and Virtualbox. AFAIK Fusion is about the same in both functionality and price. Virtualbox is free as in F/OSS.
The reason I started with Parallels instead of Virtualbox is twofold:
1) I was new to the host:OSX/vm:Win arena and wanted something someone said worked. (I did not want to buy a fancy pansy mac just to install windows on it)
2) By that time Virtualbox could not handle bootcamp.
My plan was to test to run Windows as a VM and if it wasn’t performant enough switch to bootcamp. Then I learned that to be able to run the vm as bootcamp it has to be configured as bootcamp to start with. I never did and I have never had the need.
(I would love to try to have the dev machine totally remote. Then I could have a phat machine without the fan noise.)
https://www.parallels.com/eu/products/desktop/
https://www.vmware.com/products/fusion
https://www.virtualbox.org
October 6th, 2014
Honor those who should.
Setting up a new Web site and then connecting it to Sqlserver is a breeze if one uses the development web server.
But if one wants to use the real McCoy, i.e. IIS, there is more work.
iis apppool: http://www.selfelected.com/iis-7-iisapppool-lightly-explained/
Why use the real IIS when it is so cumbersome? Because it looks more like the real production environment.
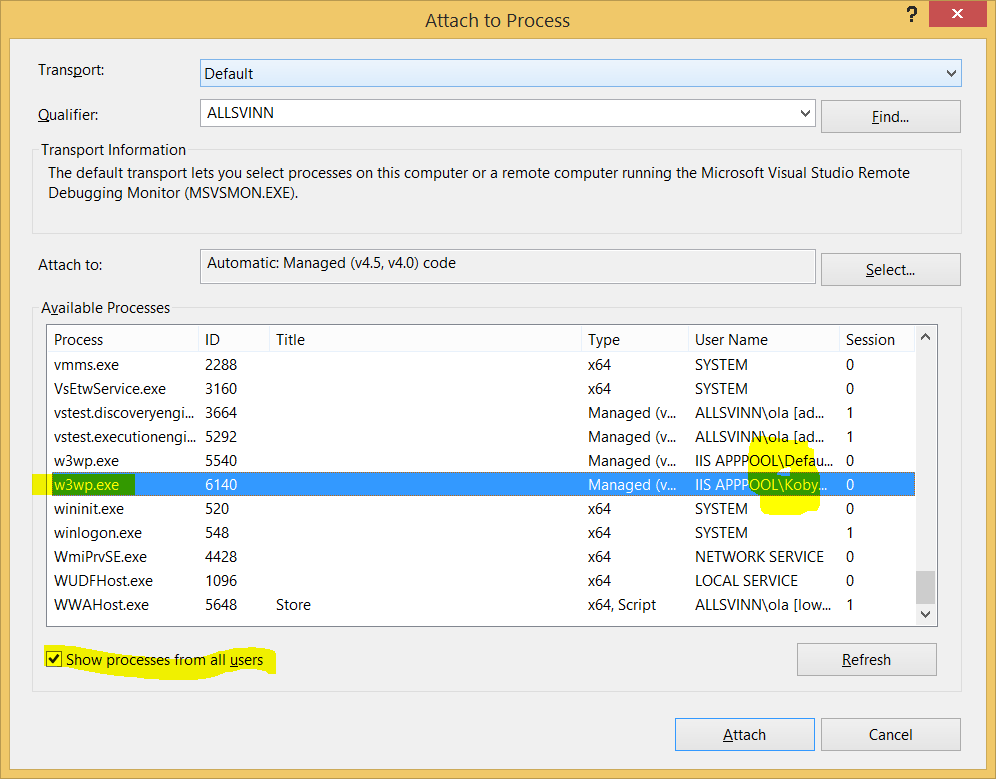
How do I debug? Like this:
Start Visual studio i in administrator mode. (if one doesn’t, VS is helpful with this)
Then ctrl-alt-p (menu:debug:attach to process) and choose the w3wp.exe process, with the right user name. Attach. Debug.
October 6th, 2014
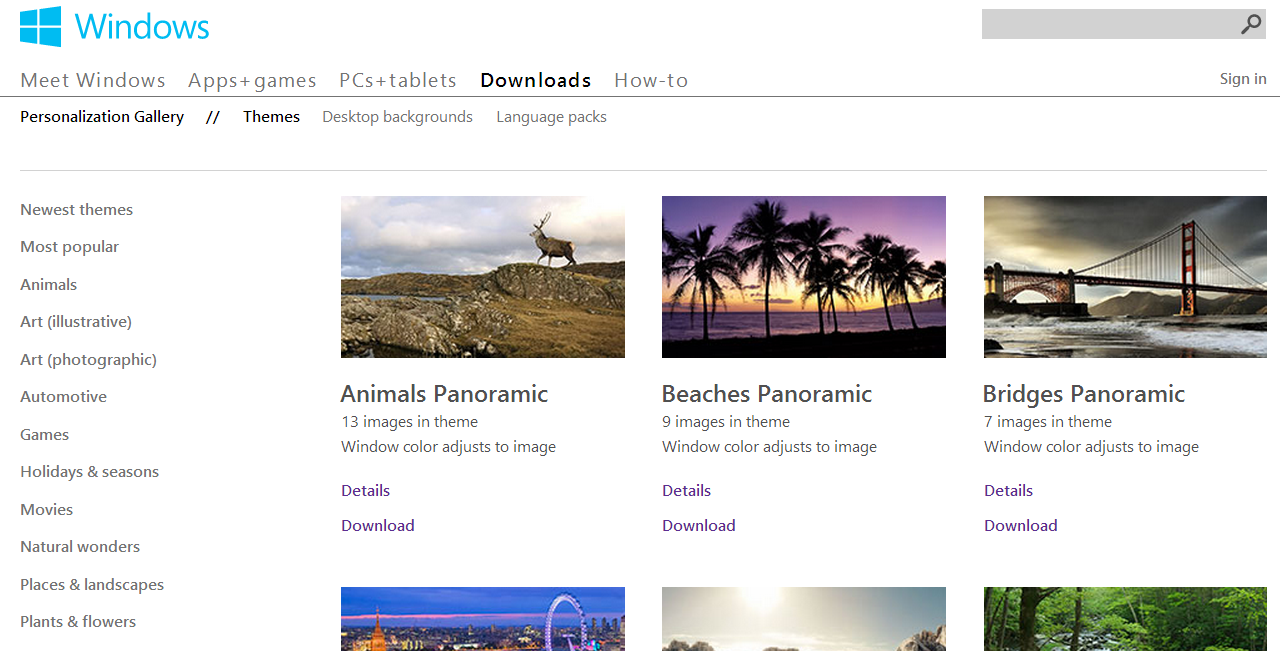
To spice up the windows desktop background Microsoft has provided an easy way to import new pictures that can be changed every 30 minutes or so. Either search (write) Get more themes online on the start menu or go here in your web browser.
Search words: windows multiple monitor screen saver
July 5th, 2012
This is not a deep diving article but just a brain dump. Maybe it will help someone. At least it works on my machine.
I wanted to use Neo4j with dotnet. So I put Neo4j as a server on the Mac and my regular dotnet stuff on a Win7 machine running through Parallels.
I don’t remember exactly what was needed to get Neo4j up and running but it was easy I recall. Download. Extract. Find the right folder. Type “neo4j start”. Open a browser. Type “localhost:7474”. Create a node. Check it was created. Done.
I opted for running Neo4j stand alone to keep my machine tidy – starting the Neo4j server every time I develop is easy.
Since I want to talk to Neo4j from another machine I need to bridge the network and open the firewall on the mac. It’s just a google away even though the way to open the firewall seems to shifts with every OSX release. To the better in my case.
A caveat that burned some time for me was that the admin GUI for Neo4j is set to only answer on localhost. It is considered a good thing since there is no usr/pwd. That is solved by updating the config and restarting the Neo4j server. Use http://yourmachine:7474 to check this.
On the Windows/Visual studio/Dotnet side I opted for Neo4jclient since it is under present development and open source. The 2 top hits I found otherwise had their last update set in 2010. It’s an easy install with Nuget.
Creating nodes from dotnet was easy. I just followed the getting started.
That’s all I’ve done for now.
March 25th, 2012
I have started at a new job and after some days of contemplation and a try-out I decided to go for running Windows as a virtual machine under OSX on an Macbook pro.
I had several reasons in no particular order.
– The hardware is nice. The rumour is that Apple don’t buy cheap stuff on the spot market. When you use a Mac it feels nice and I can play with it in the store; ordering a Dell over internet doesn’t give me the chance to handle it.
– I need to learn other stuff than the Microsoft stack. If you use a thing for long enough you start to believe the world has to be that way. I want to get that rust out of my fingers. I have installed linux several times but without being forced to use it, it has all but collected dust. Digital dust.
– I want to get started with using virtual machines for developing. I have tried developing on a Windows virtual machine on a Windows host before but failed; it was too easy to use the host for everything.
Setup:
17″ screen, 7200rpm hd, antiglare. The rest is stock and will be upgraded as time goes.
I intend to use Parallels for running my Win machines virtual. If the hardware can’t handle it I should be able to use the same virtual drive through Bootcamp.
I can’t afford SSD right now even though it was a requirement to start with. Apple’s prices are too high so I will buy on the spot market later.
I can’t afford 8gigs right now and Apple’s prices are too high so I will buy on the spot market later. I am running Win8 on 1,5gigs and that is not enough it needs at least 4. My machine doesn’t take more than 8 gigs according to the specs so I’ll probably have problems running more than 1 virtual OS at once.
For better and worse:
I have played with the first Mac thousands of years ago, worked with Mac during the 90s and I have played with my SO’s Macbookpro so I know a little from beforehand. But playing and working with pre-OSX is not the same as knowing.
The win keyboard is arguably better than the mac one. It has page up and page down as separate buttons. Yes it can be remedied by pressing fn at the mac keyboard but that not the same. The delete button is also missing and corresponding work around is more cumbersome, instead of 3 delete presses for deleting 3 characters one has to press 3 shift-right and then one backspace. If you are used to fiddling around with the mouse for moving your caret 3 characters to the right this isn’t a problem for you. But then you probably have blunt knives in the kitchen anyway.
The OSX keyboard doesn’t have a properties button but I instead have to use shift-f10 in Windows (which really is what the properties button is a shortcut for). It. Is. Not. A. Proper. Workaround.
The apple touch pad is awesome. It is awesome enough, on its own, to argue for running Win on a Mac through Bootcamp. The best touchpad I have tried on Win isn’t even close to the Mac. I use 10.7.3 and it has an even more awesome touchpad with up to 4 (5?) fingers recognition for doing stuff. I gladly confess it isn’t perfect and sometimes miss my swipes but it won’t push it from 1st, 2nd and 3rd place.
I recommend turning on all the features on the touchpad. They features are not turned on out of the box.
On the other hand, keyboard handling and shortcuts in Windows is way better than in OSX. OSX is created for people with three hands, two on the keyboard and one on the mouse. If you think using the mouse for moving around in your application is state of the art you probably have blunt knives in the kitchen too.
Give me the Mac touchpad and the Windows keyboard handling and we have nerdvana. Wait… that is what I am sitting with right now!
Appstore is a must. But why does it want to know so much about me? On my Android phone I can download anything free without giving away my credit card number.
Through my bank I can create virtual credit cards with a limited amount of money on. It works on Appstore.
OSX doesn’t have as many good gratis text editors as Windows has.
The installation of OSX is smooth. Start the machine, do your choices and you are good to go. Windows, on the contrary, requires a day and a half for reboots and checks for updates. Add another day if you want Visual studio and Sqlserver.
OSX doesn’t run the full fledged dotnet framework but Mono. Dotnet is a good framework so it is a shame.
I use Keepass on Mono in OSX. To make a long story short it fails in several ways. The most noticeable is that the good copy-password functionality in Keepass doesn’t work. Add mismatched highlighted text, crashes and that it sometimes refuses to start. It might be a bad port of Keepass, it might be shortcomings in Mono. If you give me time I will investigate but as for now I am short of spare time.
OSX has a proper *nix/BSD terminal. Windows still has its console and Console2. Windows also has Powershell which is *nix terminal piping made right. Like so: in *nix one can do lots of automation from the terminal through piping and griping. A big drawback is that what is piped is the text output and not the contents. Powershell can also pipe data between apps but uses real dotnet objects instead. Ponder this for a while and realise what a leap that is in functionality and updatability.
One of the reasons for choosing to use both OSX and Windows is to not fall into the belief that everything should look like Windows. The start menu is one of them. I have always thought the start menu was a good idea, especially after Vista when one could start entering text directly and let Windows find the application or document for you; much like Spotlight in OSX. Now I have seen OSX’s 5 finger pinch which gives me all apps as icons over the whole screen. (think iPhone) It has the same drawback as the Iphone app chooser – there are lots of icons but no system to separate them for making them easier to find.
Minimising and maximizing works better in Windows than in OSX. There are system wide short cuts and visual clues (menus that pop up). OSX can minimize a window but one needs the mouse to open it again. Sometimes.
Which brings me to Safari which has recently passed IE as the least good web browser. Example: if you detach a tab you cannot attach it again. Unless you choose to mouse to the menu window-merge all windows. When every tab in every Safari window is put into the same window. I am not saying all other browser behave differently but right now I am irritated on Safari so it has to wear my flames.
I am not irritated on Evernote but it is equally mousey. If one hides a window of Evernote one has to use the mouse to get it back.
The TextEdit editor in OSX is better than Notepad in Windows. On the other hand Notepad is (easily) replaced with other good and gratis editors. Good and gratis editors in OSX are not as plenty.
I miss the light telling me the HD is working. When the machines doesn’t respond for a few seconds it is a good clue to what is going on – is it the HD or the code that is the culprit?
My OSX version has switched up and down while scrolling. I say the OSX direction is the correct one.
Here is why: when I programmed scroll bars back in last century I learned that there is no correct way regarding what is up and down. The document goes down when the scroll bar goes up when the earlier/above text is shown when the up arrow is pressed. Now we have learned to use fingers for moving documents around and now there is only one way to look at it; the correct way.
You, dear reader, might disagree, but I suggest you embrace change, mr Quixote.
Notes:
Parallels has its own Swedish keyboard. I don’t know the difference between that and the regular OSX one.
Windows ctrl-alt-del is in Parallels fn-ctrl-alt-backspace.
I have yet to figure out where backslash is on my Swedish OSX, Swedish Win and English Win keyboards. I am not sure Parallels work properly there.
Folders in Finder is opened through command-o. Enter does something else. I won’t say it is 100% bad but I believe the Windows choice of making Enter open the folder is better.
I really miss having standardised command-o for opening, -w for closing a window, -h for hiding a window, and command-comma for settings in Windows. Alt-f4 and ctrl-f4 are steady standards in Windows but the combinations were probably invented by a chiropractor gone mad. Ctrl-o is standard and alt-enter almost so. OSX could learn something from Win what happens when a window is hidden, opening a hidden window on OSX changes from app to app and often requires the mouse.
Switching tab in windows is ctrl-tab and command-left/right in OSX. Unless where it is ctrl-tab. The gratis editor Textwrangler has its own scheme where switching document isn’t visualised as a table and requires the mouse. Which made med ditch Textwrangler since a text editor is keyboard centric and shouldn’t force me to stretch of for the mouse or move my fingers to the touch pad.
Ctrl-left/right is used in Windows for selecting a word. In OSX it is used for switching desktop. I had to turn that functionality off in OSX. I now have to do a 4 finger swipe to change desktop. I see no immediate other solution.
When I get in to heavy programming in Windows on this machine I will bring forward my Windows keyboard. I wonder how my muscular memory will react when it is subjected to the OSX layout. I plan to update this article. Let’s see if I remember.
Pressing the function buttons in OSX requires the fn key. In Windows it does not. Thankfully there is a setting in OSX System preferences to turn this off. Recommended if you run Windows under OSX.
Zooming in OSX is done through ctrl-scroll up/down (two finger swipe) much like in Visual studio. Windows has a similar functionality I can’t recall the name of and shortcut for. I have a feeling the Windows variant works better.
Update
Multi monitor support does work. Sometimes. The first time I chose it (can’t remember the name and can’t get to it – more on that further down) my second monitor lit up directly; just like “extend monitor” in Windows. A Windows boot later it refused to extend to the second monitor. Until it worked again. Unfortunately I don’t remember what I did because later Windows stopped recognising the second monitor again. Some googlingwithbing later I found a new button in Parallels that makes my second monitor availabla again. It is even better since it puts my monitors on the Mac desktops so I can choose where to se a single win monitor and single mac monitor at the same time in my multi monitor setup. According to my historical statistics this too will fail soon and I will find another solution/button/checkbox/reboot.
Here’s a caveat with my “new” multiple monitors in mac/parallels/win: I can’t get to the Parallels menu in Windows. Therefore I can’t see the original menu I used for multiple monitors and I can’t do any other settings either.
Is the text above unreadable? Yes it is. Understanding multiple monitor setup in Mac/Parallels/Windows is undoable so it is just right the explanation is unreadable too.
