August 31st, 2017
If you try to run a stand alone / self contained Dotnet core 2 solution you might run into something like:
C:\MyApp\bin\Release\netcoreapp2.0\win10-x64>TestRunCore2.exe
Error:
 An assembly specified in the application dependencies manifest (TestRunCore2.d
eps.json) was not found:
 package: 'runtime.win-x64.Microsoft.NETCore.App', version: '2.0.0'
 path: 'runtimes/win-x64/lib/netcoreapp2.0/Microsoft.CSharp.dll'
It might be because you haven’t published properly to get all the dotnet files.
Or, as in my case, I was standing in the […\win10-x64] folder and not in the [..\win10-x64\publish] folder.
I thought that by standing the [\win10-x64] folder, where my [TestRunCore2.exe] file was, dotnet would reach into the [publish] folder.
I then noticed that the [publish] folder contains both my exe and the dotnetcore files.
August 12th, 2017
I happen to have OSX as host and Win10 as virtual machine.
I have also mapped a folder so it is reachable from both OSX and Windows.
OSX has Docker installed.
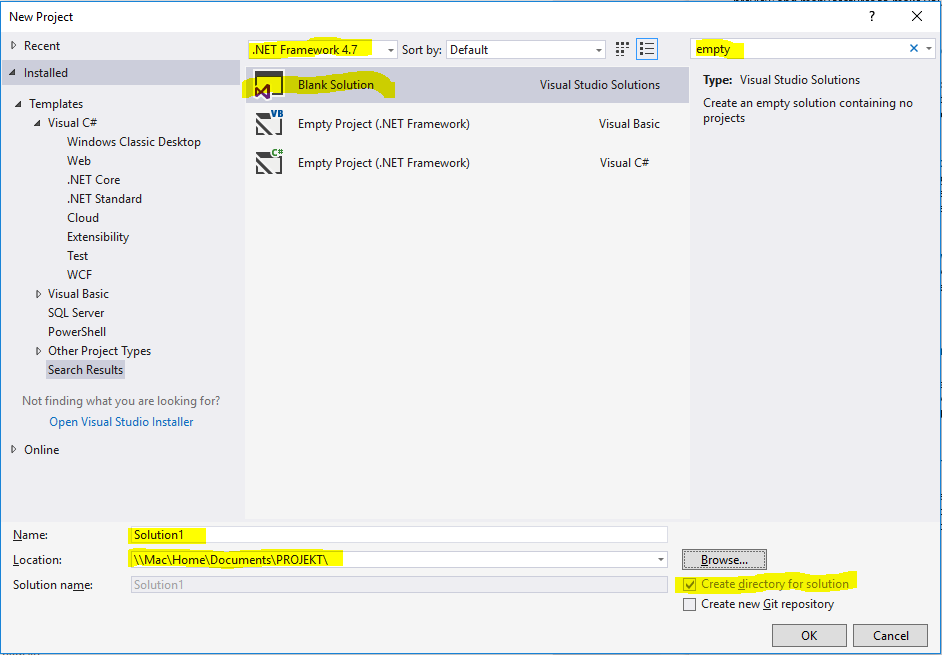
Create the project in Windows/Visual studio 2017
Create a blank solution somewhere both Windows and OSX can reach. In this article I chose
\\mac\home\documents\PROJEKT
Whatever dotnet version is visible at the top of the dialogue is not of interesting as we are creating a solution file and not much more and then we add Dotnet core specific stuff. You can search for the template through “empty” or “blank”.
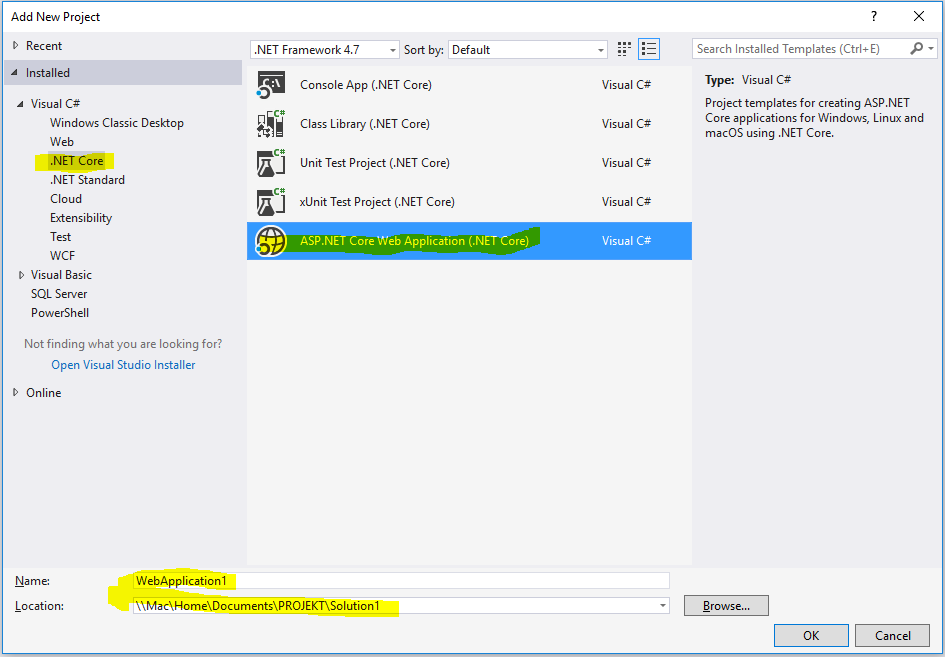
Add an Aspnet core application project. Keep the standard name of simplicity. The path is in the solution \\Mac\Home\Documents\PROJEKT\Solution1
Dotnet version is still not necessary as it refers to Dotnet framework and we are caring about Dotnet core.
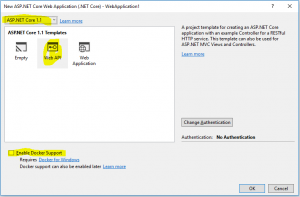
Select Dotnet core 1.1. This text is written in August 2017 and Dotnet core 2 is due November. Select WebApi. Do not add docker support. It would probably not make any change but in this exercise we are targeting running the container in OSX. If you change your mind and do want Docker-for-windows support you can always do that later with the click of a button.
When the project is added compile and run to see that all cog wheels are in place and in working order.
Tip from the trenches: Ctrl-F5 compiles, starts the web server and pop ups a web browser in one click, without having to start the debugger.
Note the URL. It is something like http://localhost:2058/api/values where /api/values is something to briefly remember. See that in the browser window there is the text [“value1″,”value2”]. It is created through the Get method in class Controllers/ValuesController.cs the “normal MVC way”.
Publish in Windows
If you right click the project (=activate the context menu in the solution explorer pane on the WebApplication1 project) there is a choice “Publish…”. AFAIK it is used for Windows or Dotnet framework stuff so leave it be.
Instead we use the CLI for restoring, publishing and activating.
If you open the console in windows you cannot use the UNC path we have put the project in. So instead use pushd like so:
> pushd \\Mac\Home\Documents\PROJEKT\Solution1\WebApplication1
Then restore the files with dotnet restore. Restoring in this case means pulling in all dependencies so we have everything we need.
It will look someting like:
> dotnet restore
Restoring packages for V:\Documents\PROJEKT\Solution1\WebApplication1\WebApplication1.csproj…
Generating MSBuild file V:\Documents\PROJEKT\Solution1\WebApplication1\obj\WebApplication1.csproj.nuget.g.props.
Writing lock file to disk. Path: V:\Documents\PROJEKT\Solution1\WebApplication1\obj\project.assets.json
Restore completed in 1,58 sec for V:\Documents\PROJEKT\Solution1\WebApplication1\WebApplication1.csproj.
Restore completed in 1,81 sec for V:\Documents\PROJEKT\Solution1\WebApplication1\WebApplication1.csproj.
NuGet Config files used:
C:\Users\username\AppData\Roaming\NuGet\NuGet.Config
C:\Program Files (x86)\NuGet\Config\Microsoft.VisualStudio.Offline.config
Feeds used:
https://api.nuget.org/v3/index.json
C:\Program Files (x86)\Microsoft SDKs\NuGetPackages\
Now publish with publish:
> dotnet publish
Microsoft (R) Build Engine version 15.1.1012.6693
Copyright (C) Microsoft Corporation. All rights reserved.
WebApplication1 -> V:\Documents\PROJEKT\Solution1\WebApplication1\bin\Debug\netcoreapp1.1\WebApplication1.dll
As we didn’t specify an output path we get the result in bin\Debug\netcoreapp1.1\.
> dotnet run
Hosting environment: Production
Content root path: V:\Documents\PROJEKT\Solution1\WebApplication1
Now listening on: http://localhost:5000
Application started. Press Ctrl+C to shut down.
Note the back slashes and that I never said to change OS. We have just started the web server in Windows.
Check it by opening a web browser and go to http://localhost:5000/api/values
You should have [“value1″,”value2”] as output. Nothing surprising.
Shut down the application (ctrl-c in the console) and refresh the browser to verify that we really are surfing to our site and not Visual studio and IIS(express).
If you want to go spelunking in the container try opening a terminal directly or connecting one.
OSX
Open an OSX terminal at your web project, where WebApplication1.csproj is. Typically something like
/Users/username/Documents/PROJEKT/Solution1/WebApplication1
If you do a dotnet run now you get an error.
> dotnet run
/usr/local/share/dotnet/sdk/1.0.1/Sdks/Microsoft.NET.Sdk/build/Microsoft.PackageDependencyResolution.targets(154,5): error : Assets file ‘/Users/username/Documents/PROJEKT/Solution1/WebApplication1/V:/Documents/PROJEKT/Solution1/WebApplication1/obj/project.assets.json’ not found. Run a NuGet package restore to generate this file. [/Users/username/Documents/PROJEKT/Solution1/WebApplication1/WebApplication1.csproj]
/var/folders/5l/1bssc0z152s_shv8j8nb9htm0000gn/T/.NETCoreApp,Version=v1.1.AssemblyAttributes.cs(4,20): error CS0400: The type or namespace name ‘System’ could not be found in the global namespace (are you missing an assembly reference?) [/Users/username/Documents/PROJEKT/Solution1/WebApplication1/WebApplication1.csproj]
Alas restore, publish and run.
> dotnet restore
Restoring packages for /Users/username/Documents/PROJEKT/Solution1/WebApplication1/WebApplication1.csproj…
Restore completed in 784.3 ms for /Users/username/Documents/PROJEKT/Solution1/WebApplication1/WebApplication1.csproj.
Generating MSBuild file /Users/username/Documents/PROJEKT/Solution1/WebApplication1/obj/WebApplication1.csproj.nuget.g.props.
Writing lock file to disk. Path: /Users/username/Documents/PROJEKT/Solution1/WebApplication1/obj/project.assets.json
Restore completed in 1.7 sec for /Users/username/Documents/PROJEKT/Solution1/WebApplication1/WebApplication1.csproj.
NuGet Config files used:
/Users/username/.nuget/NuGet/NuGet.Config
Feeds used:
https://api.nuget.org/v3/index.json
Why we need to restore it again is something I haven’t grokked yet. To be honest – if I hadn’t tricked you into, unnecessarily, restoring on the Windows machine first you wouldn’t have noticed.
> dotnet publish
Microsoft (R) Build Engine version 15.1.548.43366
Copyright (C) Microsoft Corporation. All rights reserved.
WebApplication1 -> /Users/username/Documents/PROJEKT/Solution1/WebApplication1/bin/Debug/netcoreapp1.1/WebApplication1.dll
> dotnet run
Hosting environment: Production
Content root path: /Users/username/Documents/PROJEKT/Solution1/WebApplication1
Now listening on: http://localhost:5000
Application started. Press Ctrl+C to shut down.
Open another console and curl:
> curl localhost:5000/api/values
to get the result:
[“value1″,”value2”]
You can of course open a web browser to do the same.
Don’t forget to stop the application if you want to continue as otherwise a file might get locked.
Start container
Install Docker on your mac unless you already have.
You can probably do whatever is described here on your Win10 machine with Docker for windows.
But I happen to have OSX and a virtualised Windows10 through Parallels. It is said to be possible to run Docker for windows in Parallels but then I have to fork out another 50€ (per year?) for the Pro version; and having a virtualised Windows to virtualise yet a machine creates a performance penalty also on the host OS. My machine is running warm and noisy as it is.
Start
> docker run -p80:80 -ti –rm -v /Users/username/Documents/PROJEKT/Solution1/WebApplication1/bin/Debug/netcoreapp1.1:/Web microsoft/aspnetcore /bin/bash -c ‘cd /Web/publish; dotnet WebApplication1.dll’
Hosting environment: Production
Content root path: /Web/publish
Now listening on: http://+:80
Application started. Press Ctrl+C to shut down.
Caveat: For almost a full day I got the error message docker: invalid reference format.
which was somehow related to microsoft/dotnet:1.1.2-runtime
which was wrong because when I rewrote the very same text it suddenly started. My first guess was that there was a hidden character somewhere but I rewinded to an earlier command that had failed and suddenly it worked.
If you care already now about the parameters for docker run they are:
-p80:80
I did not want to make this quick start unnecessary complex by having lots of different ports so everything is running on port 80.
With that said; as Kestrel (the web server we instantiated in Program.cs runs in aspnet it talks on port 80. Then we open a hole in the container from port 80 to port 80. This latter is what -p80:80 means.
-ti
This gives us a terminal, of sorts, and something about how it receives commands.
-rm
This one cleans up after our run so there is no halted container wasting hard drive space when the container stops.
-v /User….:/Web…
This parameter lets the continer use /Web to reach folder /User… where we have put our code.
microsoft/aspnetcore
This is the name of the image we use. An image is to a container what a class is to an object.
In this article we don’t adapt the microsoft/aspnetcore image, created by microsoft especially to run aspnet core solutions, to anything but use it as it is.
As we have not specified a version we get the latest.
Microsoft has many images for different uses.
/bin/bas…tion1.dll’
Execute a command in bash.
The command happens to be “start the web server”.
Call the web server in the container
Then open another terminal and curl:
> curl localhost:80/api/values
[“value1″,”value2”]
Yay! The web server in the container runs your dotnet core web application.
January 3rd, 2017
Prerequisite
Install docker.
Install Dotnet Core 1.1.
Create web application
Create a directory “theapp”.
Open a terminal and, in the directory, execute:
1
2
3
| dotnet new -t web
dotnet restore
dotnet run |
Check it works.
Execute, in a terminal:
Or is it
?
Create container
In a terminal execute:
(after you have have updated “YourRootedPathAndFolder” appropriately.
1
2
3
4
5
6
| docker run -p 80:80 \
-e "ASPNETCORE_URLS=http://+:80" \
-ti --rm \
-v /YourRootedPathAndFolder/TheApp:/theapp \
microft/dotnet \
/bin/bash -c 'cd /theapp; dotnet restore; dotnet run' |
and when it is finished churning through the long list of modules open a new terminal and execute
on your host to receive a smaller waterfall of HTML.
That should be it.
Troubleshooting
If you forget to do the dotnet restore
1
2
3
4
| docker run -p 80:80 \
-ti -v /Users/ola/Documents/Docker/loose/TheApp:/theapp \
microsoft/dotnet \
/bin/bash -c 'cd /theapp; dotnet run' |
You get something like:
Project theapp (.NETCoreApp,Version=v1.1) was previously compiled. Skipping compilation.
Error: assembly specified in the dependencies manifest was not found — package: ‘Microsoft.AspNetCore.Antiforgery’, version: ‘1.0.1’, path: ‘lib/netstandard1.3/Microsoft.AspNetCore.Antiforgery.dll’
Attach and request
Run
in a terminal. Note the Container ID.
Then execute, after the b5a…f5 is updated appropriately.
1
| docker exec -it b5a8ccd5b1f5 bash |
Now you have a shell inside the container and should be able to get a result from:
December 27th, 2016
Install Docker on OSX.
https://docs.docker.com/docker-for-mac/
Prepare local drive
(This is strictly not necessary but if you skip this you have to remove the -v and following path from the docker run command further down. You will also have to mkdir the app folder in the container before cd to it.)
Go to you your local Documents folder. Create a Docker folder. Inside it create a dotnetcore folder. This results in /Users/myname/Documents/Docker/dotnetcore.
Start container
Open a terminal and execute (after exchanging “myname” to your user’s name)
1
2
3
4
| docker run -p 80:80 \
-e "ASPNETCORE_URLS=http://+:80" \
-v "/Users/myname/Documents/Docker/dotnetcore:/app" \
-it --rm microsoft/dotnet |
This will download the microsoft/dotnet image, start it, connect your host’s dotnetcore folder to an app folder inside the container, set an environment variable, publish the internal port 80 on port 80 and finally open a terminal inside the container; all in one go.
Start the web server
Now inside the container execute
1
2
3
| cd app
dotnet new -t web
dotnet restore |
Absolutely not necessary but if you
you will see something like
1
2
3
4
5
6
7
8
9
10
11
12
13
14
15
16
17
| namespace WebApplication
{
public class Program
{
public static void Main(string[] args)
{
var host = new WebHostBuilder()
.UseKestrel()
.UseContentRoot(Directory.GetCurrentDirectory())
// .UseUrls("http://0.0.0.0:8000")
.UseIISIntegration()
.UseStartup<Startup>()
.Build();
host.Run();
}
}
} |
Start the web server through
This will also compile the code before starting the application.
See output
If you open
in your host’s web browser you should now see a page about Dotnet aspnet core.
That all there is to it!
Trouble shooting
If you don’t check that the web server is running and listening on port 80 locally. This is done by opening a new terminal and check the ContainerID through
Then you attach a terminal to the running container.
1
| docker exec -it d10988067ec8 bash |
(but with proper id)
Now, inside the container, run
and you should get a boatload of HTML back. In the other terminal window you should see some reaction to the request.
Links
More thourough but for version 1.0
https://store.docker.com/images/6c038a68-be47-4d7e-bfd2-33a6fe75b9ac?tab=description